【Chainer】手書き数字認識をしてみた【Deep Learning】
公開日:
:
機械学習 Chainer, Deep Learning, Google Colaboratory, MNIST, python, 手書き文字認識
Chainerを用いて、ニューラルネットワークを構築し、手書き数字認識を行ったときのメモです。
Chainerとは、日本の会社が開発しているオープンソースの深層学習フレームワークです。
手書き数字データには、MNISTを用いています。
今回は、画像認識なのですが、CNNではなく通常のニューラルネットワークを構築しています。
実装環境は、GPU環境を無料で使える Google Colaboratory で行っています。
https://colab.research.google.com/
※Googleアカウントでのログインが必要となります。
Google Colaboratory については、以前にまとめてあるので、よかったら参考にしてみてください。
【Google Colaboratory】クラウド上でPythonを使って機械学習を行う。
GPUを使用するには、新規のノートブックを作成後、「編集」→「ノートブックの設定」画面を開き、
「ハードウェア アクセラレータ」で「GPU」を選択します。
Contents
Chainer のインストール
Chainer のインストールを行います。
|
1 |
!pip install chainer |
|
1 2 3 4 5 6 7 8 9 10 11 12 13 14 15 16 |
Collecting chainer Downloading chainer-7.8.0.tar.gz (1.0 MB) |████████████████████████████████| 1.0 MB 11.0 MB/s Requirement already satisfied: setuptools in /usr/local/lib/python3.7/dist-packages (from chainer) (57.4.0) Requirement already satisfied: typing_extensions in /usr/local/lib/python3.7/dist-packages (from chainer) (3.7.4.3) Requirement already satisfied: filelock in /usr/local/lib/python3.7/dist-packages (from chainer) (3.3.0) Requirement already satisfied: numpy>=1.9.0 in /usr/local/lib/python3.7/dist-packages (from chainer) (1.19.5) Requirement already satisfied: protobuf>=3.0.0 in /usr/local/lib/python3.7/dist-packages (from chainer) (3.17.3) Requirement already satisfied: six>=1.9.0 in /usr/local/lib/python3.7/dist-packages (from chainer) (1.15.0) Building wheels for collected packages: chainer Building wheel for chainer (setup.py) ... done Created wheel for chainer: filename=chainer-7.8.0-py3-none-any.whl size=967734 sha256=58f1469c354cc122e9f02de4b92744fa50cc09b2e8f5ece45d2b7d528dab0038 Stored in directory: /root/.cache/pip/wheels/8d/45/4c/c961846626d4db2511e4acbd5056eefb2aeedcec8208a3ca42 Successfully built chainer Installing collected packages: chainer Successfully installed chainer-7.8.0 |
Chainer をインポートして Chainer のバージョンを確認します。
|
1 2 |
import chainer print(chainer.__version__) |
|
1 2 3 4 5 6 7 8 9 10 11 12 |
/usr/local/lib/python3.7/dist-packages/chainer/_environment_check.py:75: UserWarning: -------------------------------------------------------------------------------- CuPy (cupy-cuda111) version 9.4.0 may not be compatible with this version of Chainer. Please consider installing the supported version by running: $ pip install 'cupy-cuda111>=7.7.0,<8.0.0' See the following page for more details: https://docs.cupy.dev/en/latest/install.html -------------------------------------------------------------------------------- requirement=requirement, help=help)) 7.8.0 |
深層学習のためのライブラリをインポート
深層学習のためのライブラリをインポートします。
特に出力はありません。
|
1 2 |
import numpy as np import chainer |
MNIST データをロードする
手書き数字データのMNISTを「get_mnist」関数を使ってロードします。
|
1 2 3 |
train_data, test_data = chainer.datasets.get_mnist(withlabel=True, ndim=1) print(train_data) print(test_data) |
|
1 2 3 4 5 6 |
Downloading from http://yann.lecun.com/exdb/mnist/train-images-idx3-ubyte.gz... Downloading from http://yann.lecun.com/exdb/mnist/train-labels-idx1-ubyte.gz... Downloading from http://yann.lecun.com/exdb/mnist/t10k-images-idx3-ubyte.gz... Downloading from http://yann.lecun.com/exdb/mnist/t10k-labels-idx1-ubyte.gz... <chainer.datasets.tuple_dataset.TupleDataset object at 0x7f29cd5dd9d0> <chainer.datasets.tuple_dataset.TupleDataset object at 0x7f29cd5dd950> |
手書き数字画像の表示
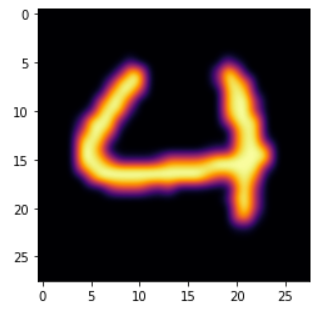
手書き数字画像を表示させてみます。
画像サイズは、28×28 pixelとなります。
|
1 2 3 4 5 6 7 |
import matplotlib.pyplot as plt # 訓練データの61番目 data_location=60 data, teacher_label = train_data[data_location] plt.imshow(data.reshape(28, 28), cmap='inferno', interpolation='bicubic') plt.show() |

正解データ(教師ラベル)を表示させてみます。
|
1 |
print(teacher_label) |
「4」と出力されます。
複数画像の表示
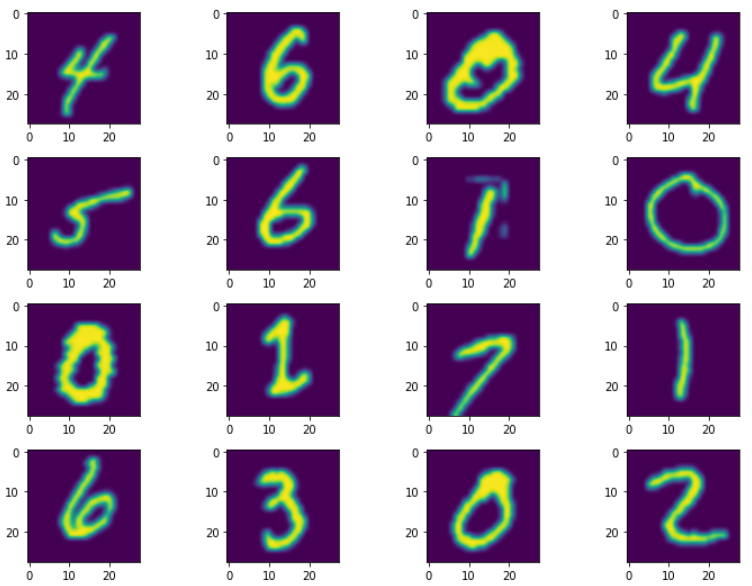
次に複数画像を表示させてみます。
|
1 2 3 4 5 6 7 8 9 10 11 12 13 14 15 16 17 18 19 20 21 22 23 24 25 26 27 28 29 |
import matplotlib.pyplot as plt # 画像表示のために行数と列数を定義 # 行数 ROWS_COUNT = 4 # 列数 COLUMNS_COUNT = 4 DIGIT_GRAPH_COUNT = ROWS_COUNT * COLUMNS_COUNT subfig = [] # x軸データ x = np.linspace(-1, 1, 10) # figsize=(横のサイズ、縦のサイズ) fig = plt.figure(figsize=(12, 9)) for i in range(1, DIGIT_GRAPH_COUNT + 1): # i番目の subfig に追加 subfig.append(fig.add_subplot(ROWS_COUNT, COLUMNS_COUNT, i)) # y軸データ(n次式) y = x ** i data, teacher_label = train_data[60+i] subfig[i-1].imshow(data.reshape(28, 28), interpolation='bicubic', cmap='viridis') # 画像の間隔を調整 fig.subplots_adjust(wspace=0.3, hspace=0.3) plt.show() |
一覧表示されます。

学習用と検証用データセット数を確認
|
1 2 |
print('学習用データセット数:', len(train_data)) print('検証用データセット数:', len(test_data)) |
|
1 2 |
学習用データセット数: 60000 検証用データセット数: 10000 |
これは、chainer のライブラリの「chainer.datasets.get_mnist」を使ったときに、自動でこの割合でデータセットを分割してくれるようです。
ニューラルネットワークの定義
まず、ニューラルネットワーク構築のためのパッケージをインポートします。
|
1 2 |
import chainer.links as L import chainer.functions as F |
今回は、マルチレイヤーパーセプトロン(ニューラルネットワーク)のクラス(MLP)を作成します。
モデルの定義は、Chainerが提供している「chainer.Chain」というクラスを継承する形で行います。
|
1 2 3 4 5 6 7 8 9 10 11 12 13 14 15 |
class MLP(chainer.Chain): # 中間層(隠れ層)のユニット数:1000 # 出力層のユニット数:10(数字0~9の10クラスのため) def __init__(self, number_hidden_units=1000, number_out_units=10): # 親クラスのコンストラクタを呼び出す super(MLP, self).__init__() with self.init_scope(): self.layer1=L.Linear(None, number_hidden_units) self.layer2=L.Linear(number_hidden_units, number_hidden_units) self.layer3=L.Linear(number_hidden_units, number_out_units) def __call__(self, input_data): result1 = F.relu(self.layer1(input_data)) result2 = F.relu(self.layer2(result1)) return self.layer3(result2) |
「__init__」は初期化時に実行されます。
「__call__」はインスタンスが作成されてから関数のように呼び出されます。
例えば、
model = MLP() とすると、「__init__」が実行されます。
model(input_data) とすると、「__call__」が実行されます。
|
1 2 3 4 5 6 7 8 |
model = MLP() from chainer import iterators BATCH_SIZE = 100 train_iterator = iterators.SerialIterator(train_data, BATCH_SIZE) test_iterator = iterators.SerialIterator(test_data, BATCH_SIZE, repeat=False, shuffle=False) |
最適化手法の設定
今回、最適化手法には、勾配降下法の「optimizers.SGD」を使います。
ちなみに、optimizers は、「最適化を行う者」という意味で、
SGD は、確率的勾配降下法(Stochastic Gradient Descent)の略となっています。
以下のように optimizers の setup メソッドでモデルを指定します。
「lr」は学習率(learn rate)のパラメータとなります。
|
1 2 3 4 |
from chainer import optimizers optimizer = optimizers.SGD(lr=0.01) optimizer.setup(model) |
|
1 |
<chainer.optimizers.sgd.SGD at 0x7fda6a6fd590> |
検証処理の設定
学習の検証処理部分の設定です。
まずは、学習の回数(MAX_EPOCH)を設定します。
|
1 2 3 4 5 |
from chainer.dataset import concat_examples import matplotlib.pyplot as plot MAX_EPOCH = 20 |
検証処理は、一回Epoch学習後に呼び出され実行されます。
|
1 2 3 4 5 6 7 8 9 10 11 12 13 14 15 16 17 18 19 20 21 22 23 24 25 26 27 28 29 30 31 32 33 34 |
def testEpoch(train_iterator, loss): # 学習誤差の表示 print('学習回数:{:02d} => 学習誤差:{:.02f}'.format(train_iterator.epoch, float(loss.data)), end='') # 検証用誤差 test_losses = [] # 精度 test_accuracies = [] while True: test_dataset = test_iterator.next() # リストを配列に結合 test_data, test_teacher_labels = concat_examples(test_dataset) # 検証データをモデルに渡す prediction_test = model(test_data) # 検証用データのロスを計算 loss_test = F.softmax_cross_entropy(prediction_test, test_teacher_labels) test_losses.append(loss_test.data) # 精度を計算 accuracy = F.accuracy(prediction_test, test_teacher_labels) test_accuracies.append(accuracy.data) if test_iterator.is_new_epoch: test_iterator.epoch = 0 test_iterator.current_position = 0 test_iterator.is_new_epoch = False test_iterator._pushed_position = None break print('検証誤差:{:.04f} 検証精度:{:.02f}'.format(np.mean(test_losses), np.mean(test_accuracies))) |
メイン処理(学習と検証)
学習と検証を行います。
|
1 2 3 4 5 6 7 8 9 10 11 12 13 14 15 16 17 18 19 20 21 22 23 24 25 |
while train_iterator.epoch < MAX_EPOCH: # 学習データセットの取り出し train_dataset = train_iterator.next() # unpack(複数の要素を持つものを分解して各変数に代入すること) train_data, teacher_labels = concat_examples(train_dataset) # 予測値の計算 prediction_train = model(train_data) # 学習誤差(得られた予測値と教師ラベルデータとを比較) loss = F.softmax_cross_entropy(prediction_train, teacher_labels) # ニューラルネットワーク中の勾配計算 model.cleargrads() # 誤差逆伝播 loss.backward() # 誤差反映、パラメータ更新 optimizer.update() # 検証用データの予測精度 if train_iterator.is_new_epoch: testEpoch(train_iterator, loss) |
以下のようなエラーが出力されてしまいました。。。
原因は調査中です。
|
1 2 3 4 5 6 7 8 9 10 11 12 13 14 15 |
StopIteration Traceback (most recent call last) <ipython-input-28-cfa4a4244a4e> in <module>() 23 # 検証用データの予測精度 24 if train_iterator.is_new_epoch: ---> 25 testEpoch(train_iterator, loss) 1 frames /usr/local/lib/python3.7/dist-packages/chainer/iterators/serial_iterator.py in __next__(self) 73 len(self.dataset)) 74 if indices is None: ---> 75 raise StopIteration 76 77 batch = [self.dataset[index] for index in indices] StopIteration: |
学習済モデルの保存
今回学習したモデルを保存することができます。
|
1 2 3 4 5 |
from chainer import serializers serializers.save_npz('chainer-mnist.model', model) %ls -la |
「chainer-mnist.model」という名前の学習済みモデルが保存されていることが確認できました。
|
1 2 3 4 5 6 |
total 6532 drwxr-xr-x 1 root root 4096 Oct 18 05:36 ./ drwxr-xr-x 1 root root 4096 Oct 18 03:41 ../ -rw-r--r-- 1 root root 6668678 Oct 18 05:36 chainer-mnist.model drwxr-xr-x 4 root root 4096 Oct 8 13:44 .config/ drwxr-xr-x 1 root root 4096 Oct 8 13:45 sample_data/ |
学習済モデルのダウンロード
保存モデルは、サーバー上にあるので、ローカルにダウンロードします。
|
1 2 |
from google.colab import files files.download('chainer-mnist.model') |
|
1 |
Downloading "chainer-mnist.model": |
というわけで、今回は、Deep Learning(深層学習)を使って、手書き文字認識の学習モデル構築をしてみました。
参考文献
関連記事
-

-
【機械学習】 scikit-learn で精度・再現率・F値を算出する方法【Python】
今回は、2クラス分類で Python の scikit-learn を使った評価指標である、精度(P
-

-
【機械学習】決定木(decision tree)について。
教師あり学習の一つである決定木(desicion tree)について勉強したことを書いていきます。
-

-
機械学習の手法のまとめ。
機械学習は、「与えられた入出力事例をモデル化する行為」のことで、ディープラーニングなどで注目を集めて
-

-
【探索】ダイクストラ法・最良優先探索・Aアルゴリズムの比較。
縦型探索や横型探索では、機械的に順序を付け、最小ステップでゴールを目指します。 つまり、
-

-
【Weka】CSVファイルを読み込んで決定木を実行。
フリーの機械学習ソフト Weka を使って、CSVファイルを読み込んで決定木(Decision Tr
-

-
【画像認識】 Google画像検索結果を取得する方法 【google image download】
今回は、深層学習(DeepLearning)で画像認識をするための画像データの収集を、Google画
-

-
【PyTorch】畳込みニューラルネットワークを構築する方法【CNN】
今回は、PyTorch を使って畳込みニューラルネットワーク(CNN)を構築する方法について紹介しま
-

-
【Weka】アソシエーション・ルール(association rule)【機械学習】
フリーの機械学習ツール Weka でアソシエーション・ルール(association rule)を使
-

-
【Weka】欠損データを自動的に補完するフィルタを使ってみた。
機械学習で用いるデータについてです。データは完璧なことに越したことはないが、通常は、ある属性の値が入
-

-
【PyTorch】GPUのメモリ不足でエラーになったときの対処方法。
PyTorch で深層学習していて、 GPUのメモリ不足でエラーが出てしまったので、対処方法のメモで


